
If you've ever imported a moving head sequence into xLights only to discover that your fixtures don't move the way they were programmed, you're not alone.
Moving heads are among the most exciting props you can add to a holiday display,
They're also one of the few devices where two models that look nearly identical can behave completely differently.
At Pixel Pro Displays, we've created PPD Certified Mapping Files for many of the most popular hobby moving heads sold by U.S. vendors.
These files help bridge the differences between our programming layout and your moving head models
Our goal is to make it easier to import PPD moving head sequences while preserving the intended movement and effects.
The video accompanying this article walks through the entire process, from downloading and importing a sequence into your own layout.
The reason comes down to mapping.
Why Moving Head Mapping Is Different
Unlike pixels, where every node simply turns on with a color value, moving heads contain many different DMX channels.
A typical fixture may include channels for:
- Pan
- Tilt
- Dimmer (Intensity)
- Color Wheel
- Gobos
- Focus
- Prism
- Shutter
- Speed
- Additional specialty functions
The challenge is that manufacturers don't always place these functions on the same DMX channels. One moving head might use Channel 1 for the dimmer, while another uses Channel 8. Pan and tilt directions can also vary between manufacturers. And of course, each moving head can rotate in different directions, either clockwise or counter-clockwise.
It is exactly for these reasons that Moving Heads sequence importing is not simple. With multiple vendors sequencing with many different models of moving head lamps, it's easy to get lost on how you can effectively import a vendor sequence. Pixel Pro Displays has gone out of their way to create Certified Mapping Files for the most popular US vendor moving head models. Moving Heads are considered an advance prop and you should be warned from the start that there is a lot of ground work and understanding you must have in order to successfully run these into your show.
Start by Creating a Dimmer Submodel
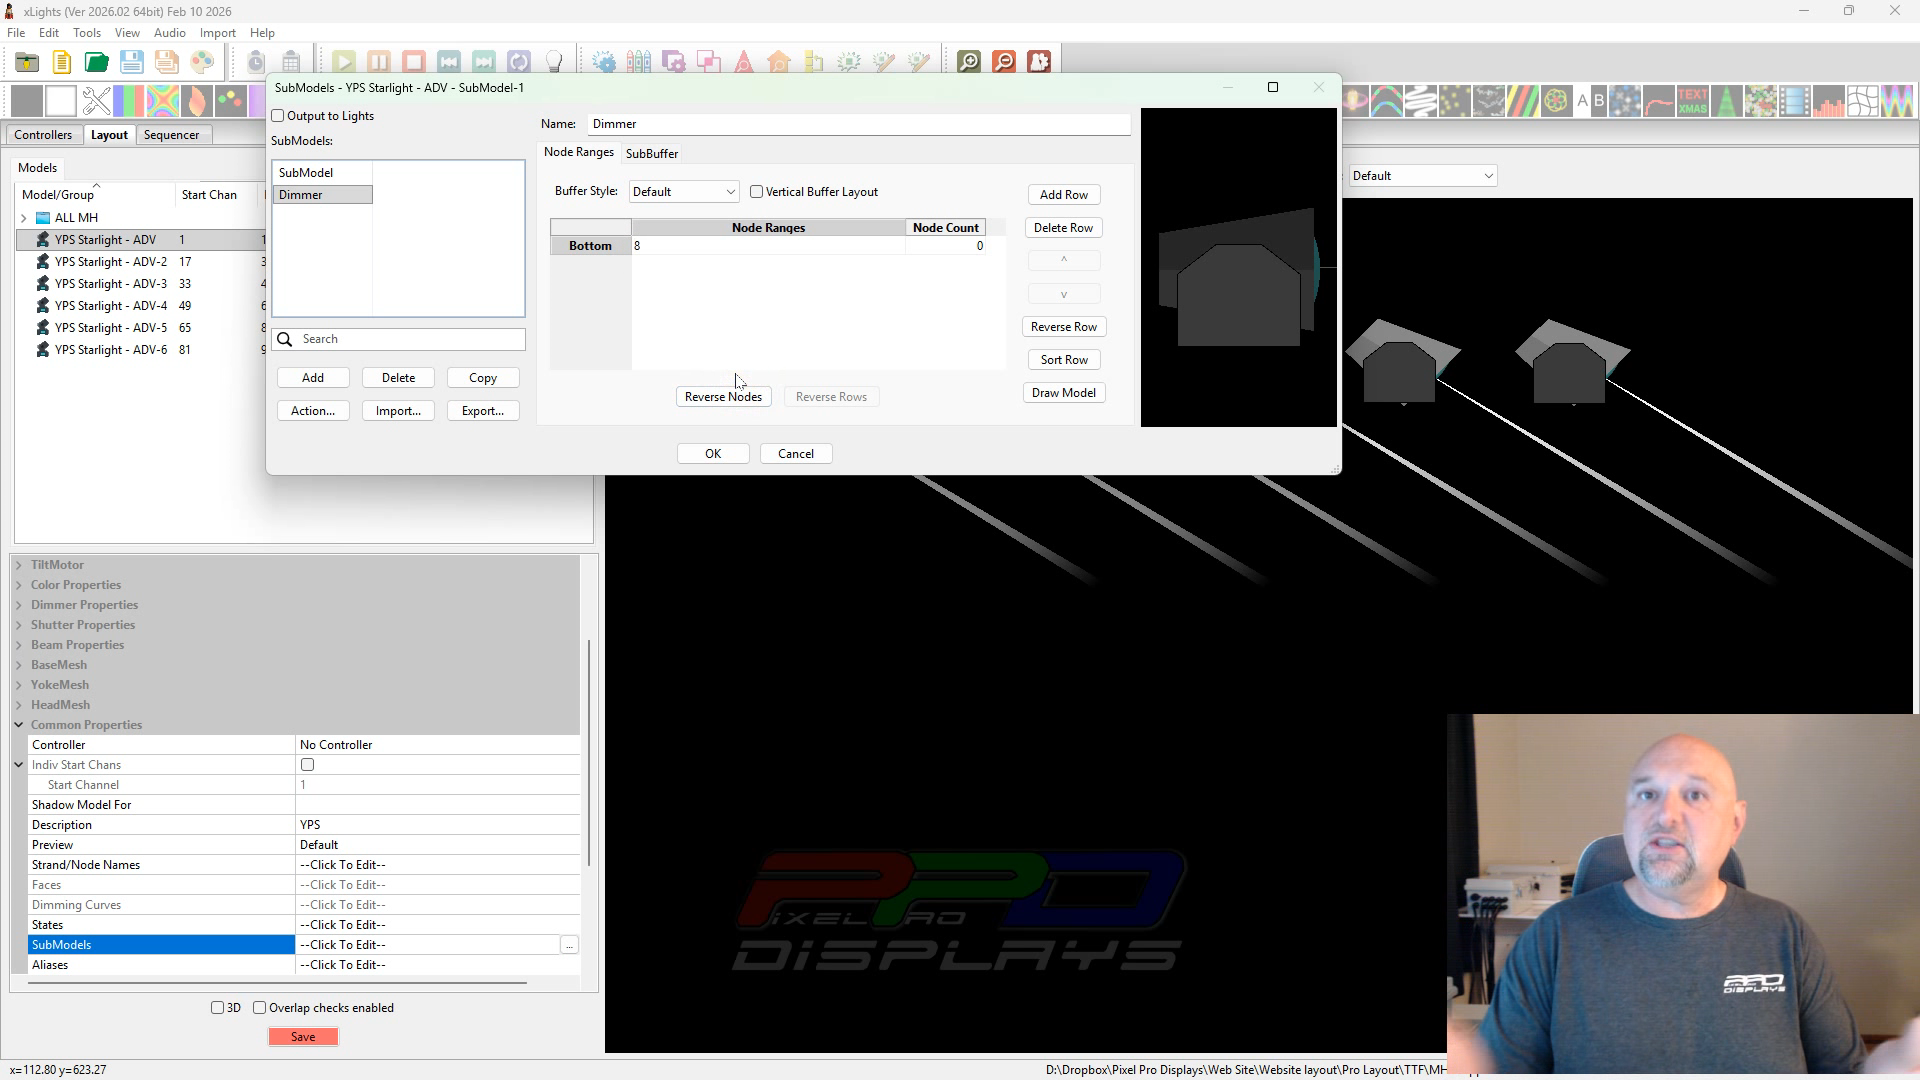
The first recommendation is creating a dedicated Dimmer submodel for every moving head in your layout.
This allows xLights to correctly map the PPD Intensity effects and ensures that dimming behaves exactly as it was programmed. In the video, Clyde demonstrates how to determine which DMX channel controls the dimmer and then creates matching submodels before importing any effects.
Although this only takes a few minutes, it's one of the most important preparation steps.
Organize Your Moving Heads with Groups
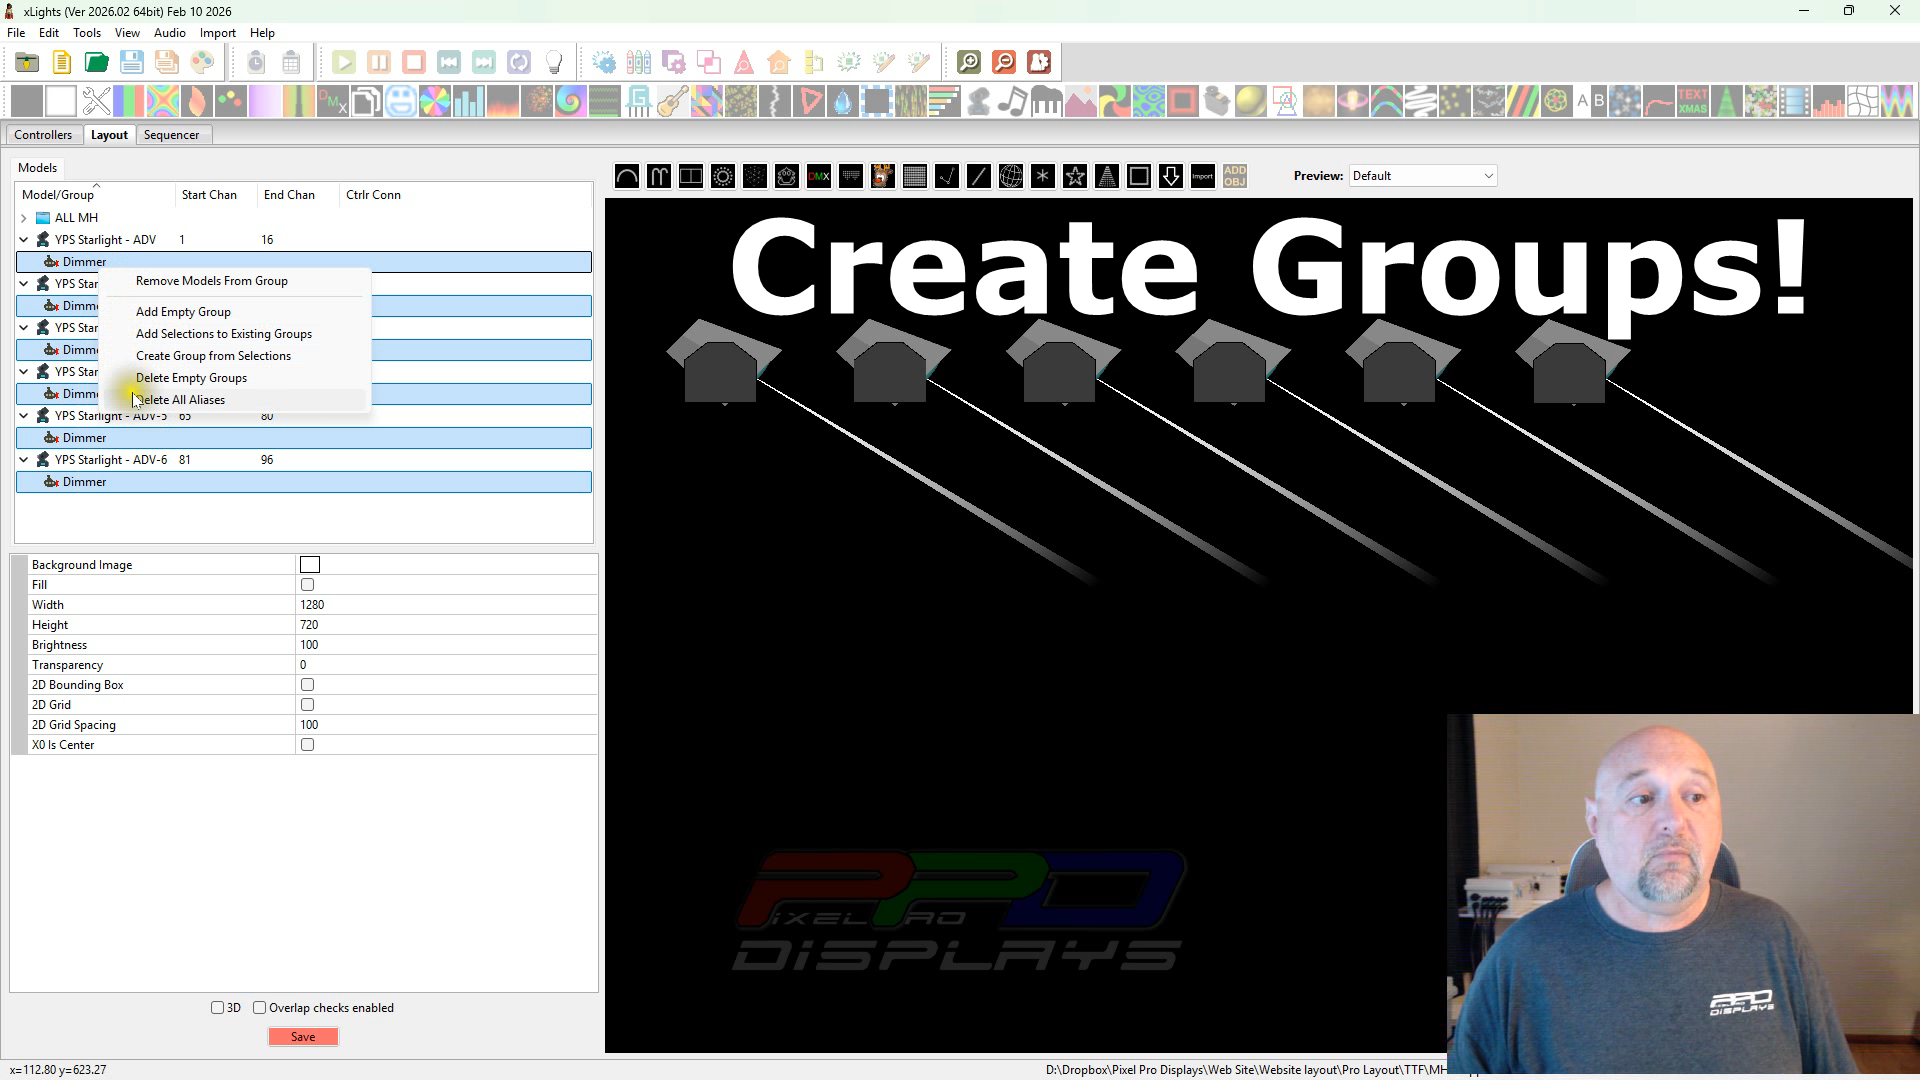
Once you've created the dimmer submodels, the next step is organizing your layout.
We recommend creating two groups:
- All MH – Contains all of your moving head models.
- MH Dimmers – Contains the dimmer submodels you just created.
These groups make importing future PPD Moving Head sequences much easier.
When you import your first PPD Moving Head sequence, you'll map the PPD moving head models and dimmer submodels to your own layout. At that point, save the mapping as a Sequence Map.
Save Your Mapping File Once
One of the biggest time savers demonstrated in the video is creating your own mapping file between the PPD layout and your layout.
A Sequence Map is different from a PPD Certified Mapping File.
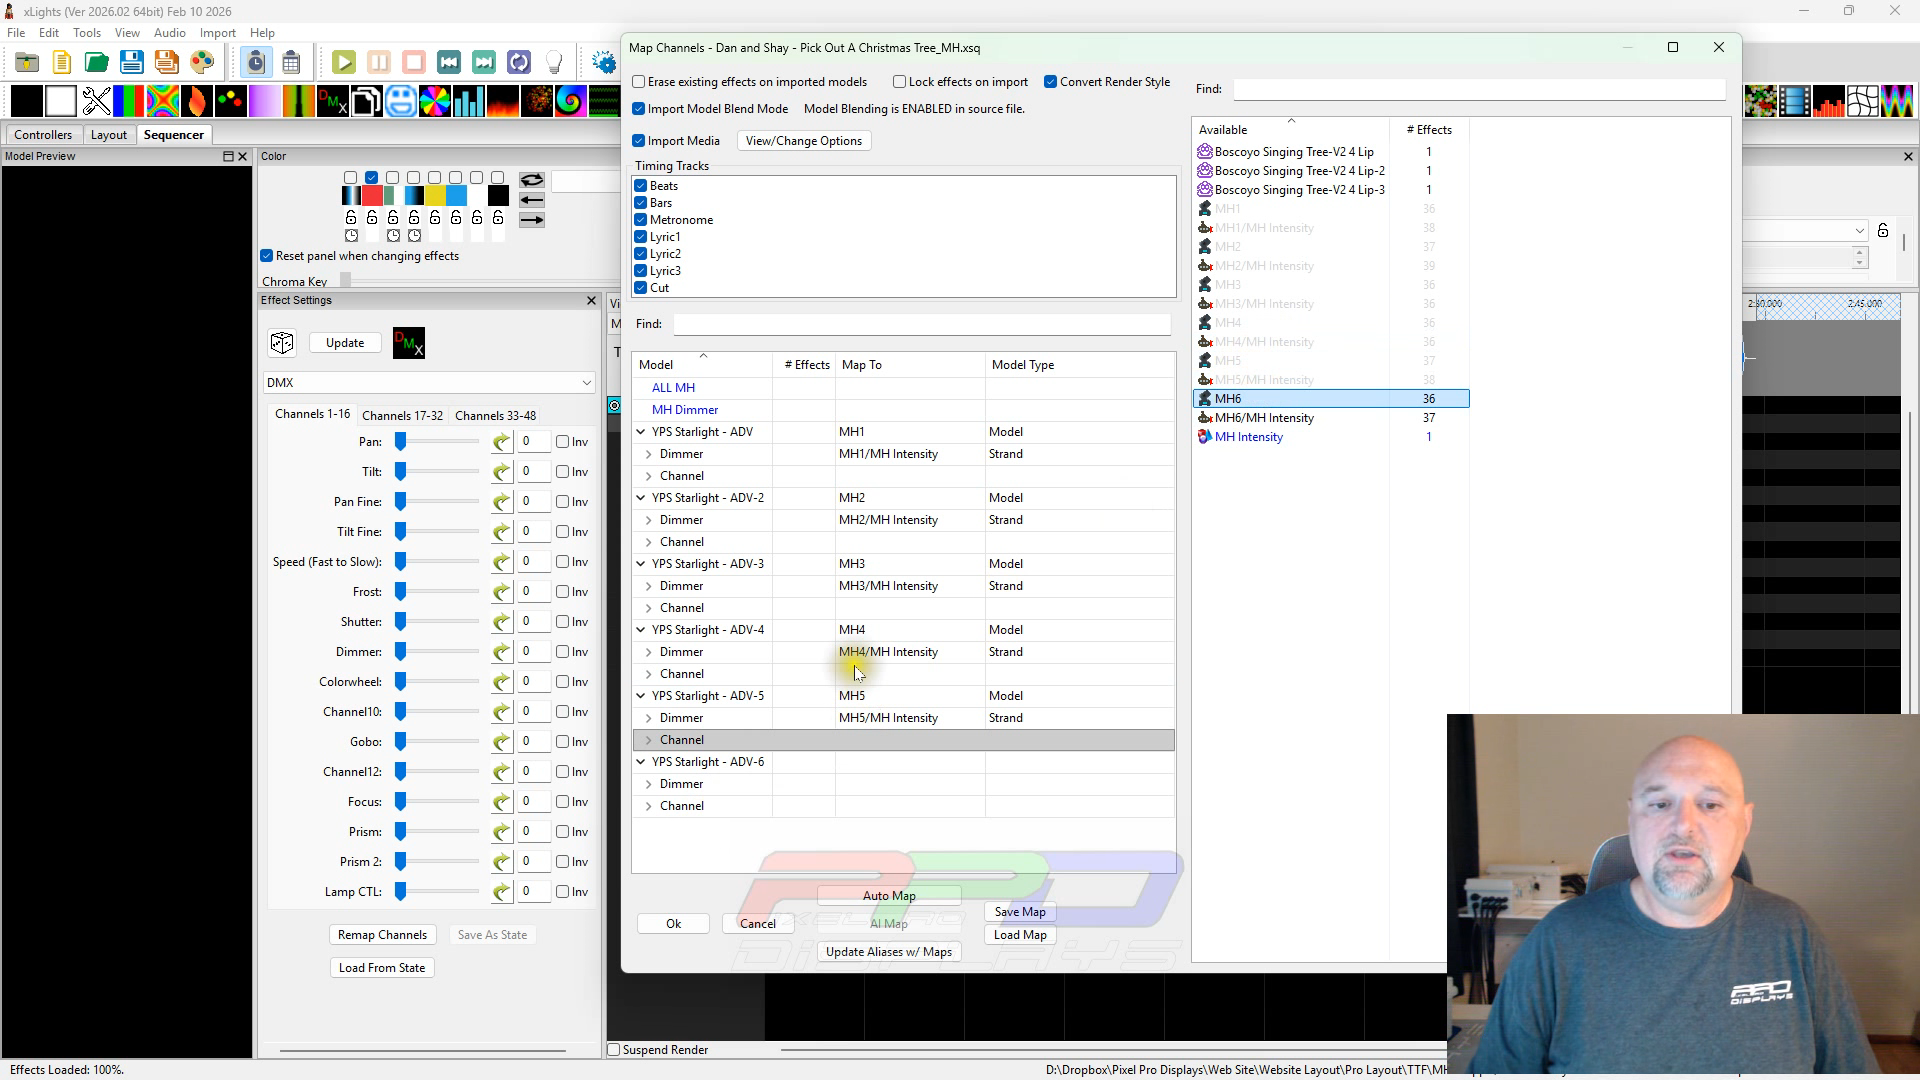
A Sequence Map simply remembers how the models and groups in a PPD sequence correspond to the models and groups in your xLights layout. The next time you import a PPD Moving Head sequence, you can click Load on the Import Effects mapping screen, select your saved Sequence Map, and xLights will automatically match the PPD moving head models and dimmer submodels to your layout—no dragging, double-clicking, or remapping each model individually.
This is a huge time saver if you regularly purchase PPD Moving Head sequences, since you'll only need to create the Sequence Map once. Future PPD moving head sequences can then reuse that mapping file, allowing new imports to take only a few clicks instead of rebuilding everything from scratch.
Using PPD Certified Mapping Files
Even after mapping the models themselves, some fixtures require additional channel remapping.
This is where the PPD Certified Mapping Files come in.
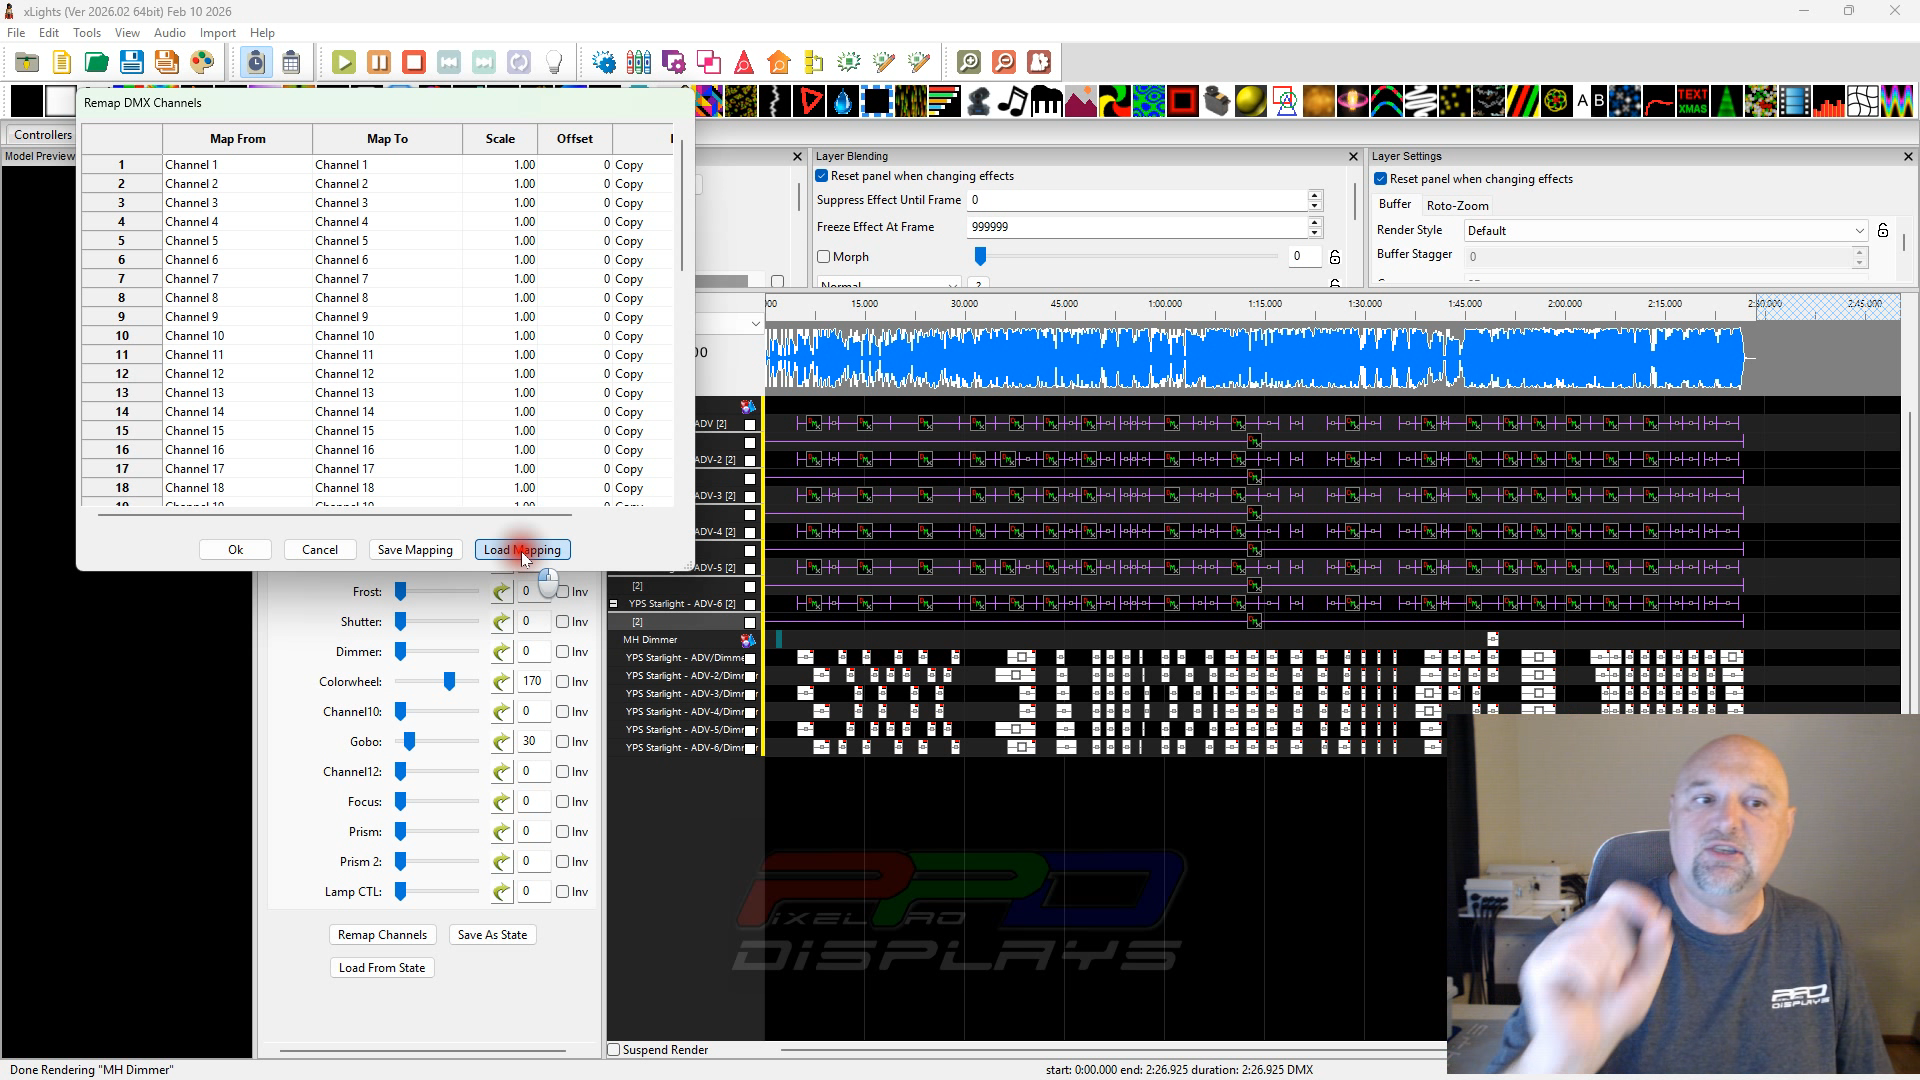
Each certified file is built specifically for a supported moving head model and automatically remaps channels to match that fixture's DMX configuration.
Some models may also require additional adjustments, such as:
- Pan offsets
- Pan inversion
- Other model-specific corrections
These instructions are listed directly alongside each Certified Mapping File on the Certified Moving Head page of the PPD website so you know exactly what changes need to be made.
As you saw in the video, not all moving heads point perfectly in the direction you want them to. Clyde mentions in the video that you may need to use the xLights Adjust Effect in order to limit the DMX movement that may point your beams in an undesirable direction such as into other homes or cars. An extensive review of the Adjust effect can be found in this PPD Webinar video below and is relevant to correcting any issues you may have after mapping a moving head sequence.
Supporting the Hobby Vendors
One thing that makes the Certified Models program unique is that it focuses on the hobby community.
Rather than supporting generic imported fixtures with countless variations, PPD has worked to create mapping files for moving heads offered by well-known U.S. hobby vendors. This helps ensure compatibility while also supporting the companies that provide customer service, xLights models, and ongoing support to the Christmas lighting community.
What moving head models are not supported?
While we have great respect for all vendors, Pixel Pro Displays cannot provide Certified Mapping Files for every brand of moving head.
Creating a Certified Mapping File requires more than a vendor simply offering a fixture. To properly certify a model, we need access to reliable xLights model definitions, consistent DMX channel information, and enough documentation to thoroughly test the mapping process. Many off-brand or generic vendors will purchase a quantity of moving heads from any Chinese manufacture, only to replenish their with a different version as they move their inventory. We find that the US Vendors demand consistent quality and work closely with their manufacture to insure a quality fixture from season to season.
Because of these vendor demands, we confidently support and recommend only the hobby vendors. By focusing on these xLights community leaders, our ability to provide you with an effective Certified Mapping File can be insured.
Small Adjustments Can Make a Big Difference
Even with certified files, every display is a little different.
Some installations may need:
- Minor pan adjustments
- Tilt corrections
- Fixture alignment tweaks
Fortunately, once you've identified the correct settings for your particular model, those changes typically remain the same for every future sequence you import.
Watch the Complete Tutorial
This article covers the concepts behind moving head mapping, but the accompanying Twinkle Tips Friday video demonstrates every step inside xLights, including:
- Creating dimmer submodels
- Building moving head groups
- Importing PPD sequences
- Creating reusable mapping files
- Loading Certified Mapping Files
- Applying pan offsets and inversion
- Verifying that your moving heads perform exactly as intended
If you're planning to add moving heads to your holiday display—or already own them—this tutorial can save you hours of trial and error.
You can also browse all currently supported fixtures by visiting the PPD Certified Models page and downloading the mapping file that matches your moving head.
What If My Moving Head Isn't Supported?
If your moving head was purchased through Amazon, eBay, AliExpress, or another marketplace that doesn't provide an xLights model, getting it working with PPD Moving Head sequences will require a few additional steps.
The first step is creating or obtaining a working xLights model for your fixture. Before any mapping can begin, the model must accurately represent your moving head and be tested to verify that pan, tilt, dimmer, color wheel, gobos, and any other DMX functions operate correctly within xLights. PPD does not create moving head models.
Once you have a working xLights model, the process of importing PPD Moving Head sequences is very similar to the workflow shown in this guide. You'll create the necessary dimmer submodels, organize your moving heads into groups, create a reusable Sequence Map, and then determine any channel remapping or adjustments your fixture may require. The video link below shows a step by step process to create your own DMX channel remapping file that custom works for your moving head.
You can follow the Moving Head Mapping video here on how to create your own mapping:
While we're always happy to help our customers, creating xLights models for unsupported moving heads is outside the scope of our support. Building and validating a new moving head model can take many hours and requires detailed knowledge of the fixture's DMX implementation. Because every unsupported fixture is different, it simply isn't practical for us to create custom models for every moving head on the market.
However, if you already have a fully functioning xLights model and need assistance with creating your own mapping file, we'd be happy to work with you during a scheduled one-on-one consultation. Together, we can use one of your PPD Moving Head sequences to identify the required channel remapping, offsets, inversion settings, and any other adjustments needed to get your moving heads performing correctly. Click the link here to setup a one-on-one consultation with Pros at Pixel Pro Displays:
While moving heads can seem intimidating at first, once you've created your xLights model, saved your Sequence Map, and applied the correct Certified Mapping File, importing future PPD Moving Head sequences becomes fast and repeatable. Most of the setup only needs to be done once, allowing you to spend more time creating great-looking shows and less time troubleshooting.