Introduction
Introduce the idea that every RGB decorator eventually discovers that organizing controllers is just as important as building them.
Mention that this article isn't about buying a fancy label maker—it's about developing a system that makes setup, troubleshooting, and next year's installation easier. Clyde reflects on how his methods evolved over more than a decade, improving a little each season rather than trying to get everything perfect the first time.
Why Controller Output Labels Matter
If you've only built one or two controllers, Controller Output Labels might seem like a small detail. After all, when everything is fresh in your mind, it's easy to remember which pigtail goes to which prop. However, that changes quickly as your display grows and another season rolls around.
Controller Output Labels do much more than identify a cable. They help you set up your display faster, troubleshoot problems with confidence, and make future upgrades much easier. It is possible to remember the output configuration, however, your labels will remove the guessing when it comes time to connect up to your show. A clear labeling system lets you identify each output at a glance.
Just as importantly, good organization saves time every year. During the holiday season, there is always another prop to repair, another sequence to tweak, or another project waiting for your attention. Investing into a reliable and easy to read labeling system for your controllers will save hours of frustration when it's time to set up this season and beyond.
As you'll see throughout this article, my approach to Controller Output Labels has changed dramatically over the past 13 years. Some methods worked well, others didn't last as long as I had hoped, and each new controller taught me something valuable. The goal isn't to build the perfect controller the first time, it's to make each build a little better than the last.
First, let's look at why Controller Output Labels are worth the effort.
📷 Old controller with faded and missing labels
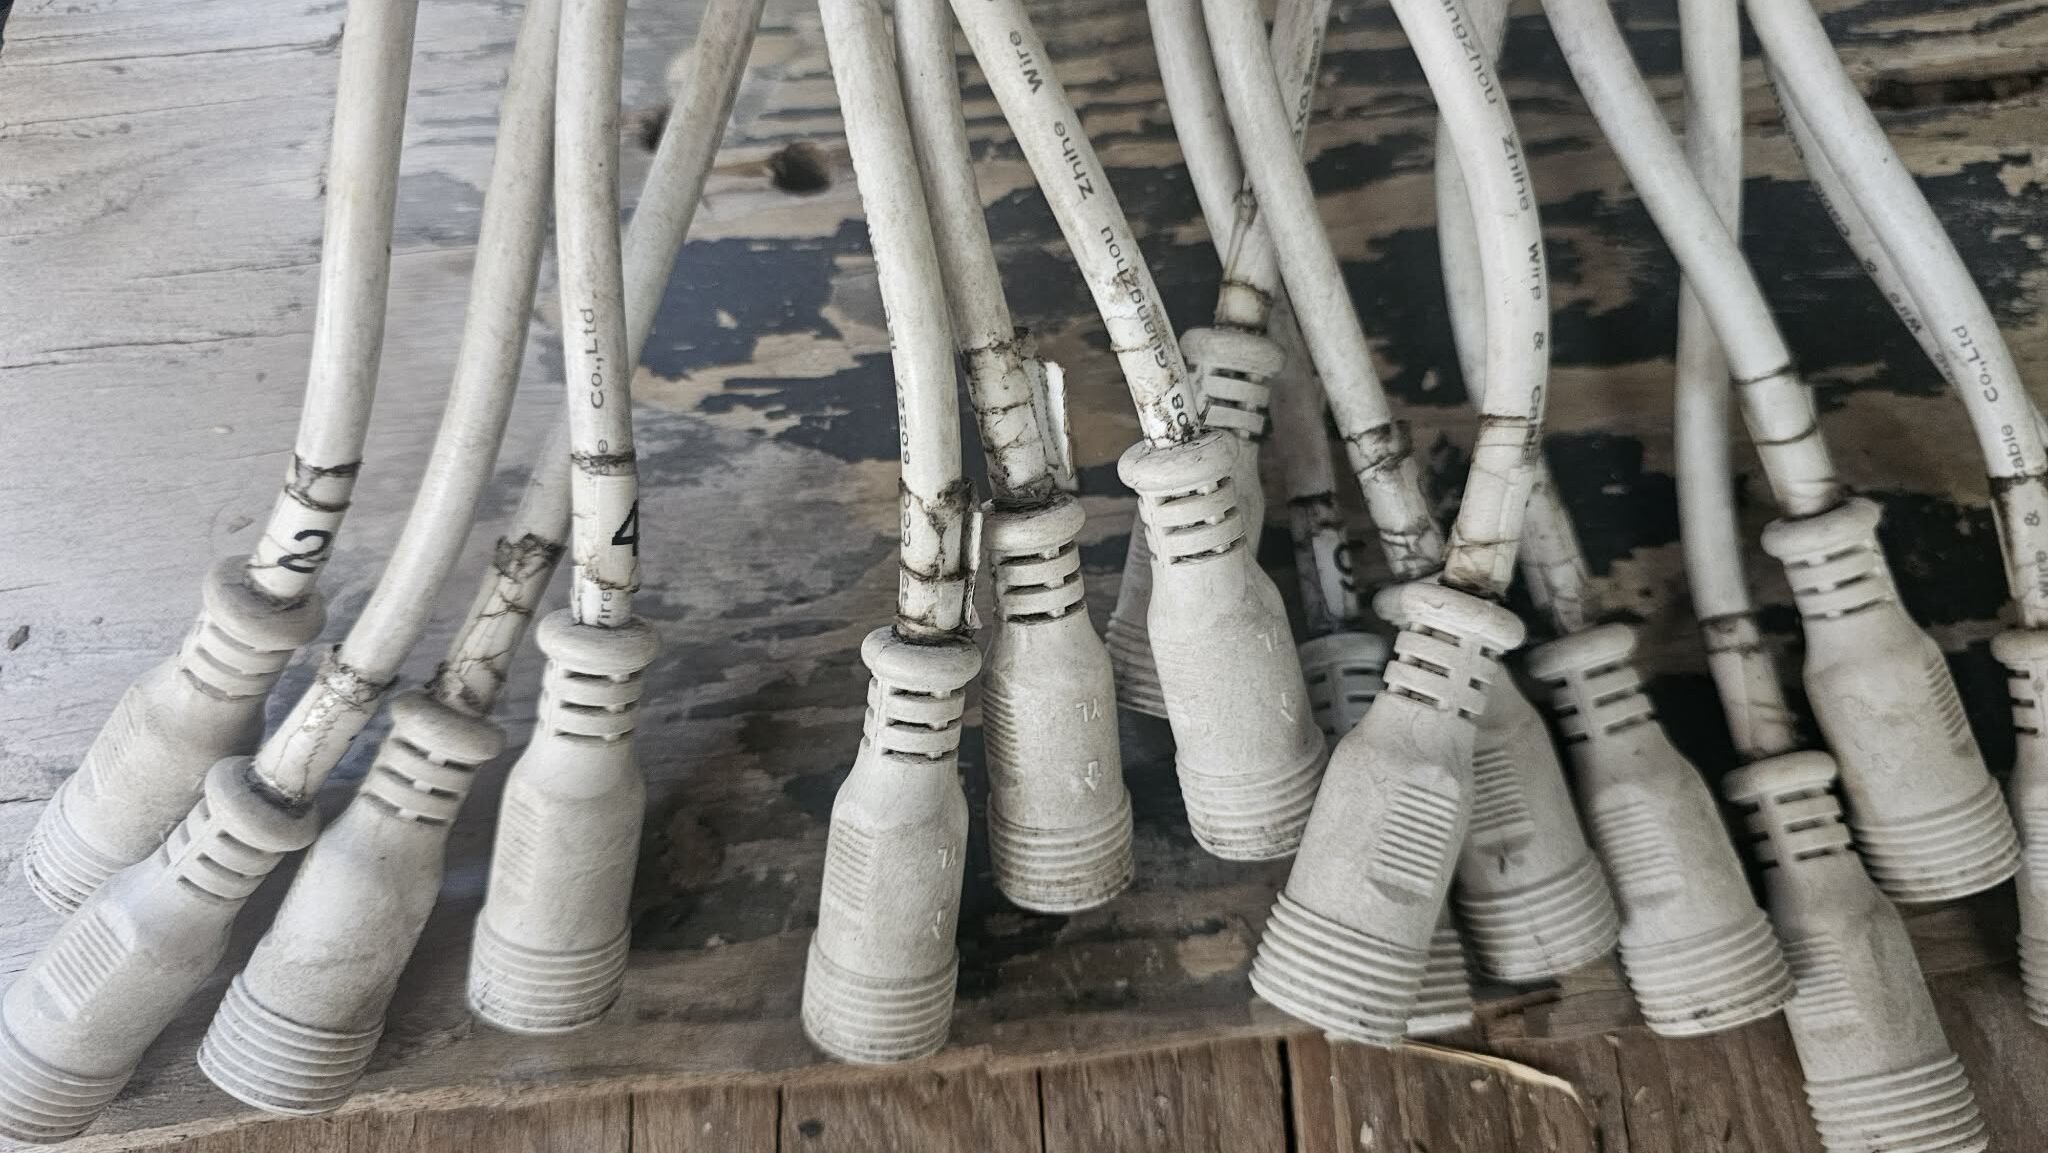
Early Controller Output Labels using tape and printed numbers
These labels were placed on this controller build 2015. Curious where this journey began? Watch the original 2015 controller review video below. You'll see how much my building techniques and Controller Output Labels have evolved over the years.
My First Controller Output Labels
Like many decorators, I didn't spend much time thinking about Controller Output Labels when I built my first controllers. My goal was simple: get the controller finished, save as much money as possible, and put those savings toward buying more pixels. At the time, the labeling system I came up with seemed like a perfectly reasonable solution.
I used a simple handheld label printer to create numbers for each output and attached them to the pigtails with ordinary clear tape. It was inexpensive, quick to install, and worked well enough to identify outputs 1 through 16. For those early builds, that was all I needed.
However, time has a way of exposing the weaknesses in even the best ideas. After years of sitting outdoors through changing weather conditions, the tape began to peel, the labels started falling apart, and what once looked organized became much harder to read. The system had done its job, but it wasn't built to last for the long haul.
Looking back, I don't consider those early Controller Output Labels a mistake. They were simply the best solution I knew at the time. One of the great things about this hobby is that your skills evolve with every controller you build. As you gain experience, you'll naturally discover better materials, cleaner installation methods, and more efficient ways to organize your display.
That's exactly what happened to me. Each new controller became an opportunity to improve on the last one, and over the years those small improvements added up to a much cleaner, easier-to-maintain system.
Transition:
However, time has a way of exposing the weaknesses in every shortcut.
Improving Controller Output Labels with Heat Shrink
Improving Controller Output Labels with Heat Shrink
As my controller builds became more organized, I knew my original Controller Output Labels needed to improve as well. The tape-and-label method had served its purpose, but I wanted something that would stand up to years of outdoor use.
My first upgrade was simple. I continued using my handheld label printer, but instead of taping the labels to each pigtail, I slipped a piece of clear heat shrink tubing over the printed label before wiring the pigtail into the controller. Once the wiring was complete, I slid the heat shrink into place and applied heat to seal everything together.
The difference was immediate. The labels looked cleaner, were protected from the weather, and held up much better through multiple display seasons. For a long time, this became my standard method for creating Controller Output Labels.
Then, another opportunity came along. Ricky from CCL Controllers included professionally printed heat shrink labels with several of the controller build kits he sent me. These labels looked fantastic and gave my controllers an even more polished appearance. They were durable, easy to read, and made each enclosure look professionally finished.
Unfortunately, there was one drawback. Once I used up the supply Ricky had provided, I couldn't easily make more. Creating custom printed heat shrink labels requires specialized equipment that I simply didn't own, and purchasing a dedicated heat shrink printer wasn't practical for the number of controllers I build.
That left me searching for another solution.
Image 1: Close-up of a pigtail with a heat shrink label.
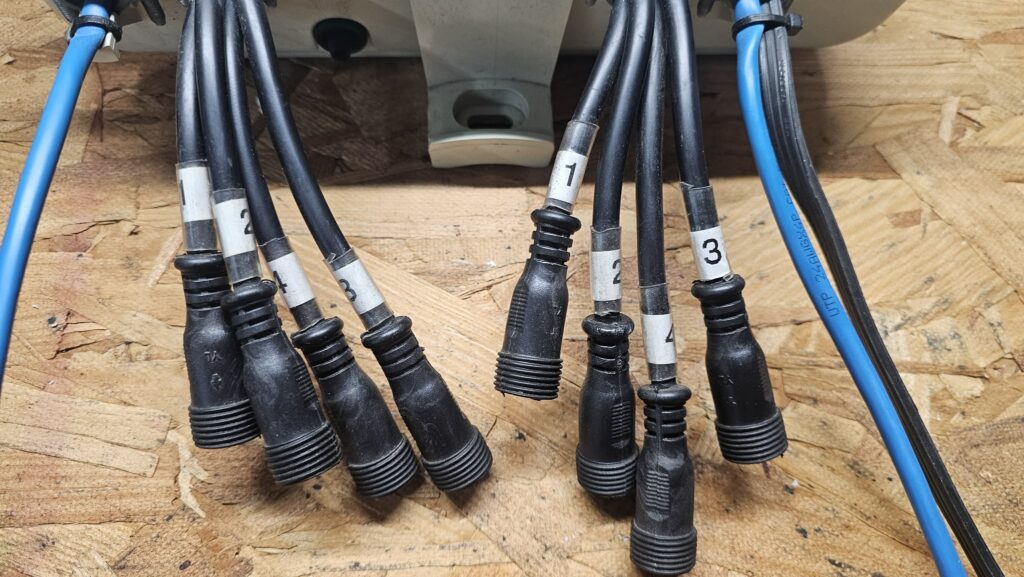
Clear heat shrink protected the printed labels far better than tape and held up well through multiple seasons.
Heat shrink Controller Output Labels on RGB pixel controller pigtails
But sometimes the outcome wasn't as good as I thought?
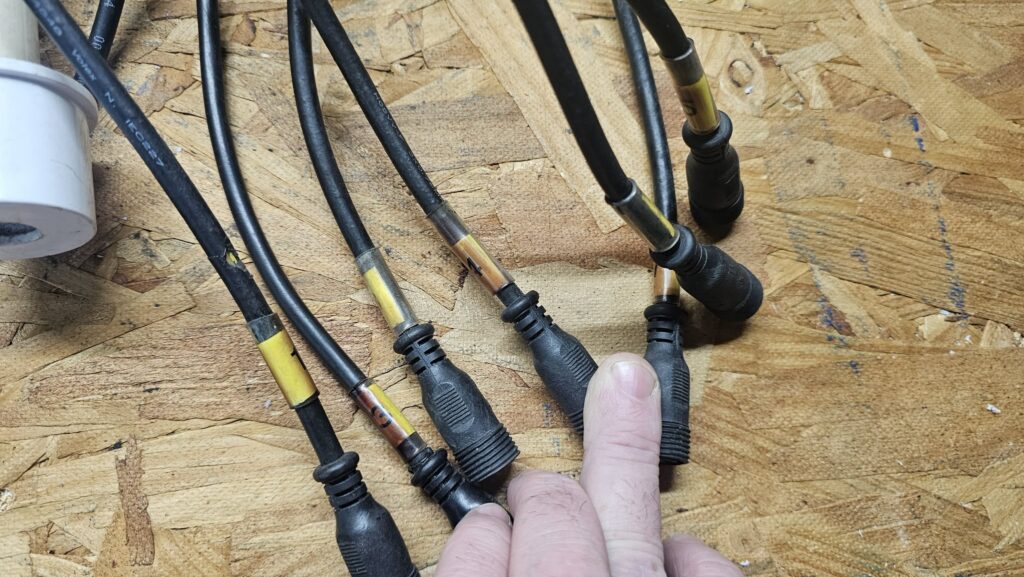
Faded by the sun and hard to read
Next, I wanted something that would last longer.
Why I Switched to 3D Printed Controller Output Labels
Why I Switched to 3D Printed Controller Output Labels
By this point, my display had grown considerably. I was no longer building only 16-output controllers. Suddenly I had 8-output controllers, 4-output smart receivers, and a variety of custom controller layouts that didn't fit neatly into my original numbering system.
At the same time, many of my oldest Controller Output Labels were beginning to show their age. Some had faded, others had become difficult to read, and several simply weren't as durable as I wanted after years of outdoor use.
As a result, I started experimenting with 3D printing.
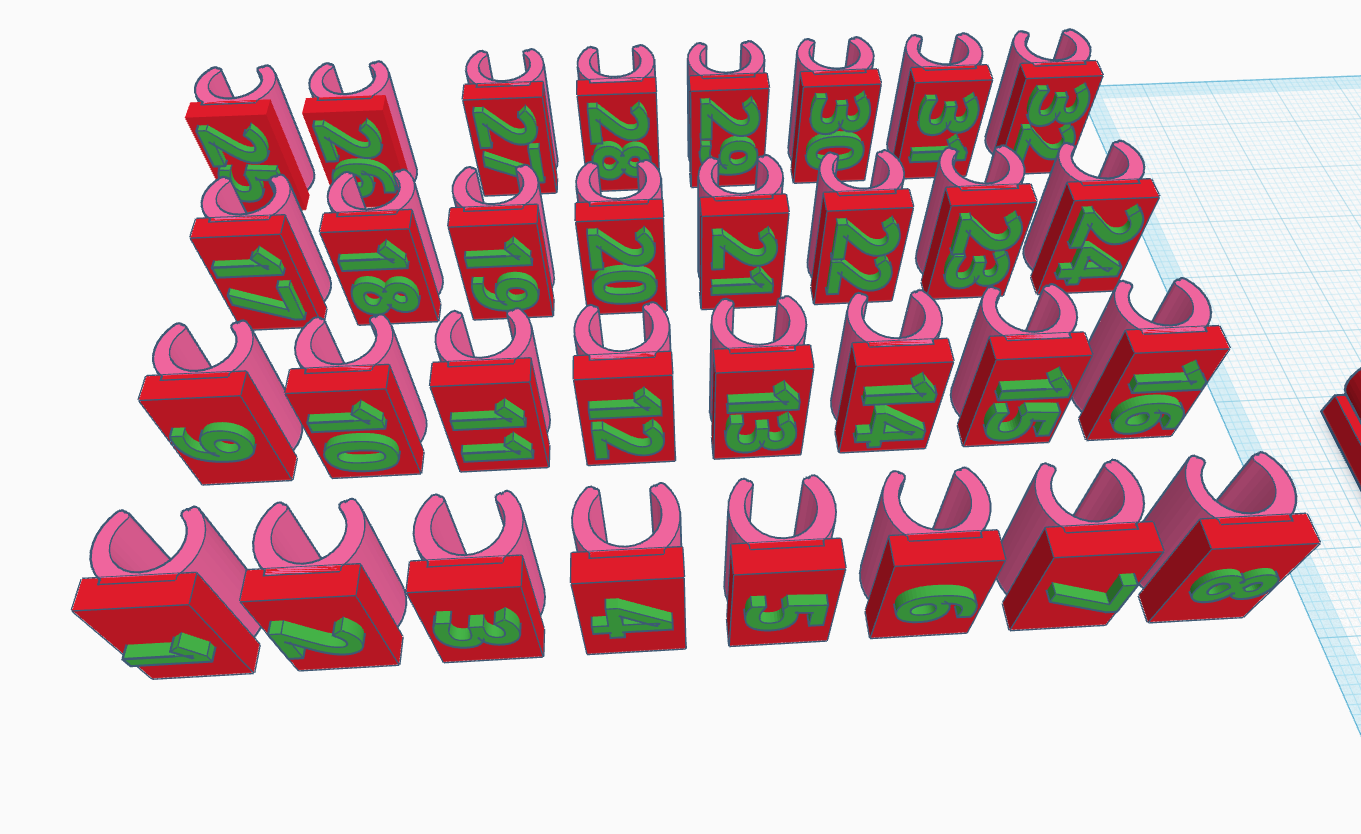
What began as a way to replace worn-out labels quickly became an opportunity to completely rethink how I organized my controllers. Instead of creating labels for only one specific controller, I could design custom clip-on labels for virtually any output number or controller configuration. Whether I needed labels for an 8-output controller, a 4-output smart receiver, or something entirely different, I could print exactly what I needed whenever I needed it.
Looking back, switching to 3D printed Controller Output Labels wasn't just about replacing old labels—it was about creating a system that could grow along with my display.
Eventually, 3D printing opened the door to an entirely new approach.
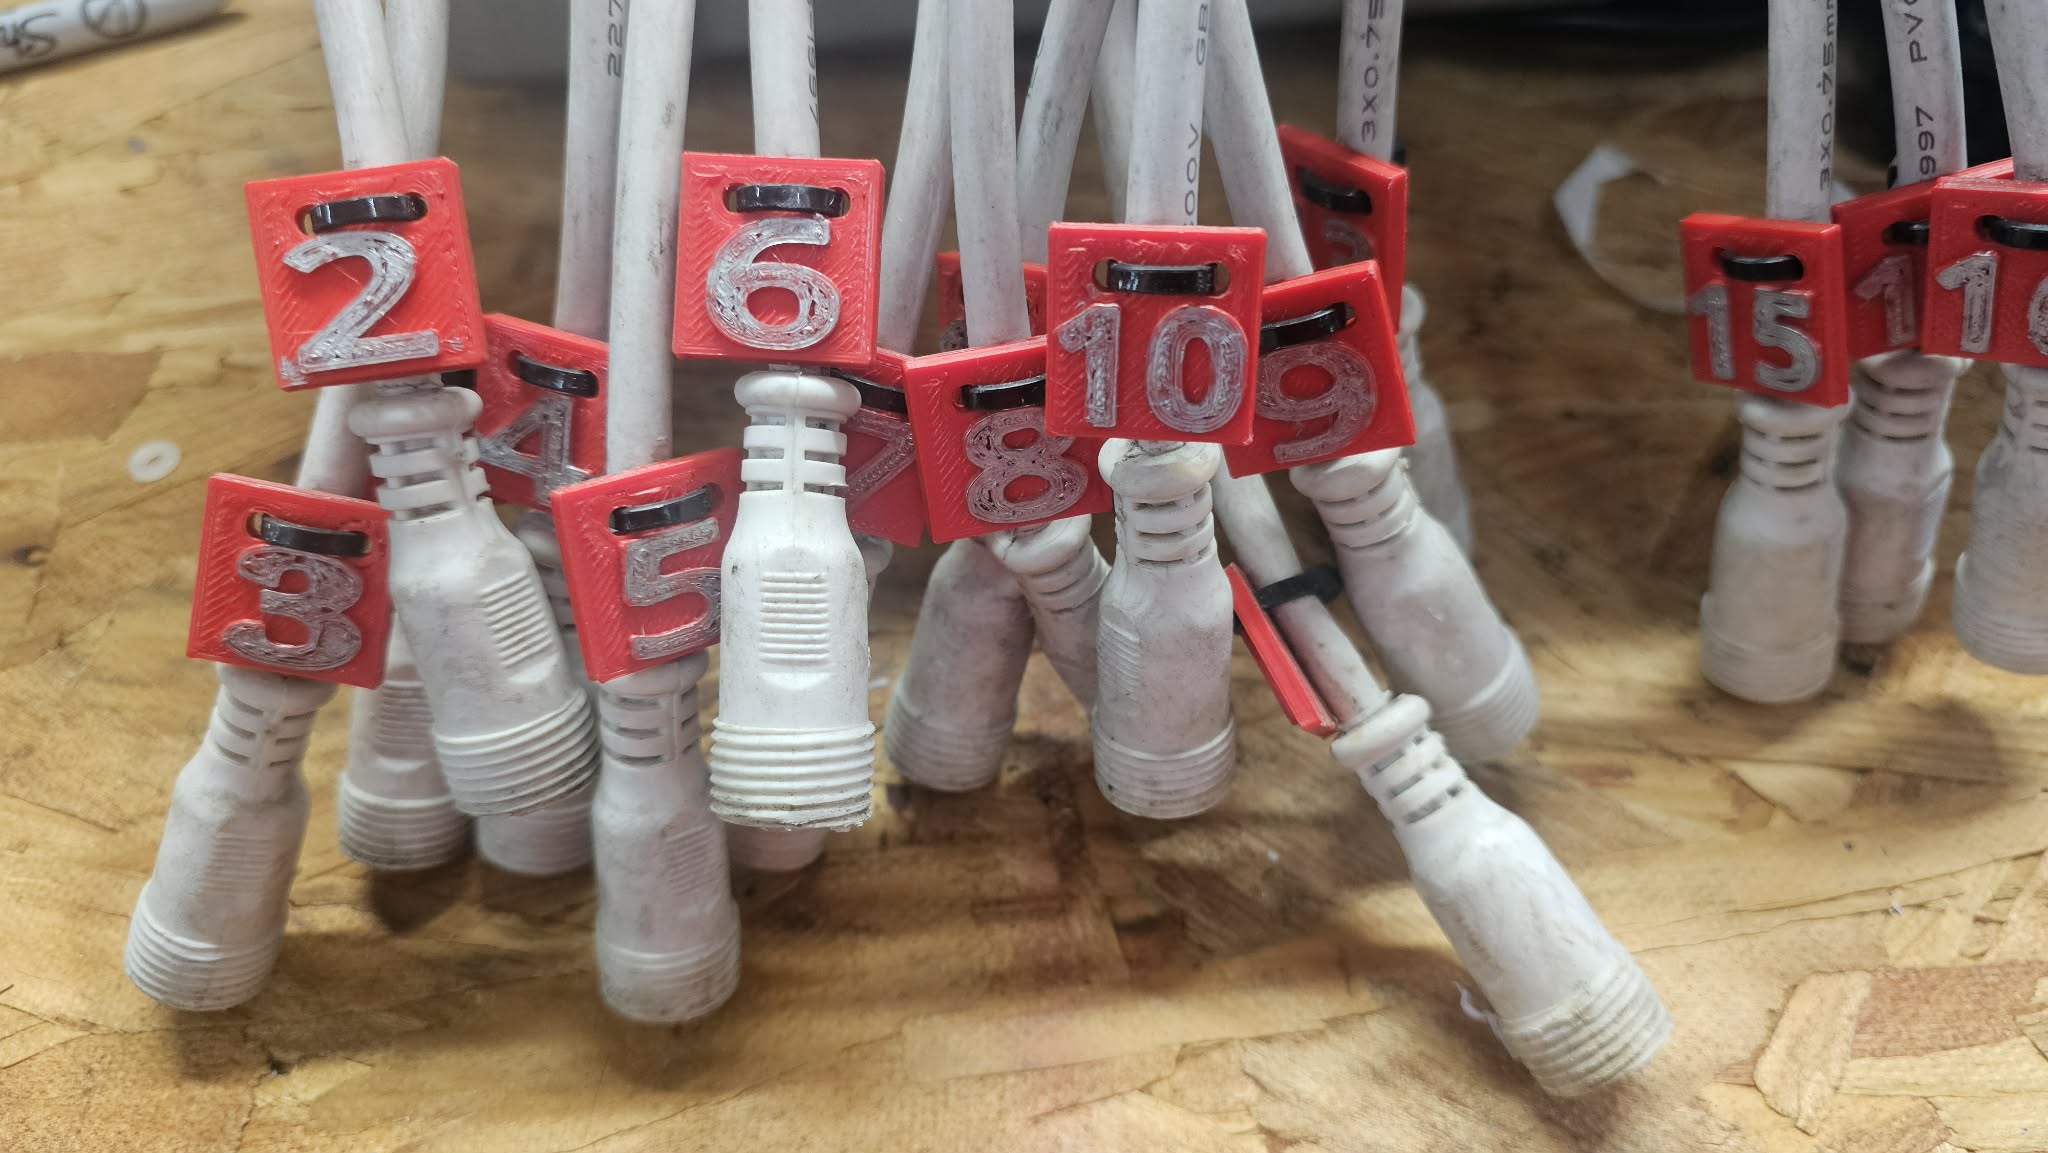
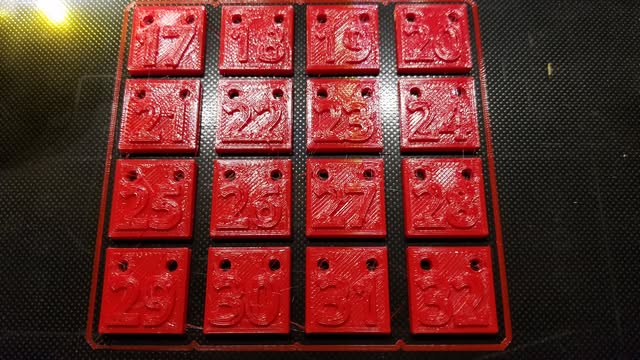
First generation 3D printed Controller Output Labels (above) did a great job when attaching to the outputs with missing tags.
Current Controller Labels
After years of experimenting with different labeling methods, I finally settled on using 3D printing for my Controller Output Labels. What started as a way to replace worn-out labels has evolved into an ongoing project that's still changing today.
Unlike my earlier methods, 3D printing gives me complete freedom to create exactly the label I need. If I add another controller, build a smart receiver, or decide I want a different numbering system, I simply design a new label and print it. I don't need a specialized heat shrink printer or pre-printed labels—I can create exactly what I need whenever I need it.
However, I quickly discovered that there wasn't one perfect design. Over the years, I've created several different versions of my Controller Output Labels, and each one taught me something new. Some feature raised numbers that can be highlighted with a permanent marker, making them easy to read from a distance. Others use recessed, or "negative," numbers where the color of the pigtail jacket shows through the opening instead of printing the number itself. By printing those clips in a contrasting color—such as white or yellow on a black cable—the number becomes surprisingly easy to identify at a glance.
The reason for multiple designs is simple: not every controller is built the same. On some enclosures, raised-number clips fit perfectly and provide excellent visibility. On others, especially controllers with a retaining nut on the female pigtail, the raised style doesn't fit as well. That's where my recessed designs shine. Rather than forcing one solution to work everywhere, I refined the labels to fit different hardware and different installation situations.
As a result, my current Controller Output Labels aren't really a single design—they're a collection of designs that I've developed and refined over the years. Each version solved a different problem, and each improvement came from actually using the controllers in my display season after season.
j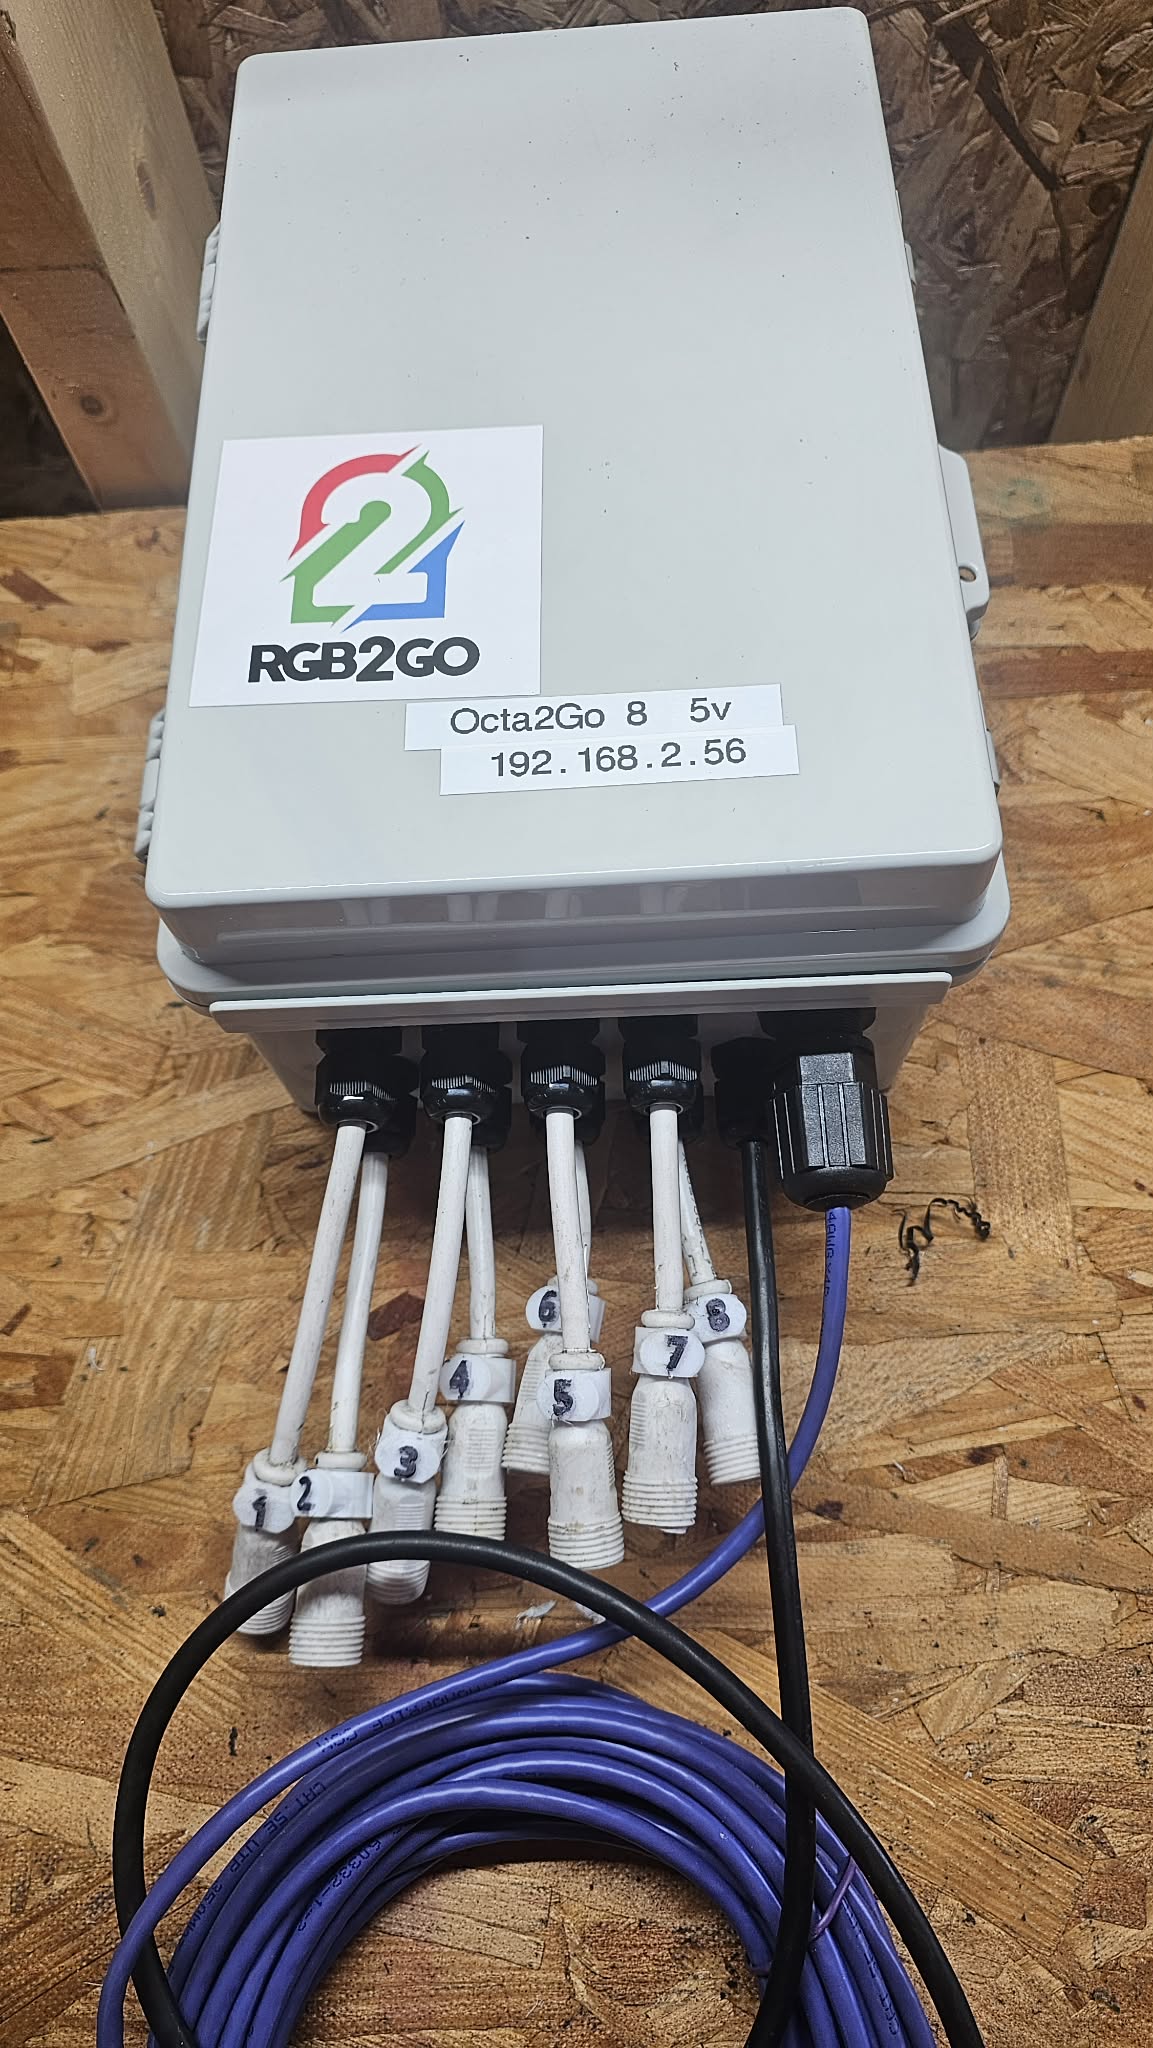
In addition, I've learned that good Controller Output Labels work best when they're paired with good controller organization. During my more recent builds, I've switched to PG9 cable glands because they provide a little more room around the pigtails and have proven to be more durable than the smaller PG7 glands I used years ago. I also spend more time planning the spacing of each output so the pigtails line up neatly.
Does that mean this is the only way to label a controller? Absolutely not. Every decorator will eventually develop a system that fits their own workflow. What I've learned is that the best Controller Output Labels are the ones that make your display easier to build, easier to troubleshoot, and easier to set up next season. Could I go out and spend another $50 or $75 on a printer to make the nice heat shrink printed labels? Sure I could, but it's another tool that is only used for one thing in the hobby. I already spent the money on my 3D printers and so it stands to reason that I should use those for this exact task.
More importantly, they remind me of something I've learned over the past 13 years: your first idea rarely becomes your final one. Every controller you build teaches you something, and every improvement makes next year's setup just a little easier.
That's why I say... Next Year Will Thank You.
Newest controller labels clip right on to the cable. No need for a zip tie. And, this version allows the connector's nut to pass right over top of it, allowing for a solid connection at the controller.
Modern Controller Output Labels using 3D printed clip-on markers
More Than Your Outputs...
While Controller Output Labels make it easy to identify individual pigtails, don't stop there. Over the years, I've learned that labeling the enclosure can save much time.
Once the controller build is finished, the last things I do is create a label for the enclosure
Enclosure labels allow me to know at lot of information at a glance. Exactly which controller I'm looking at and what voltage it runs help insure I'm connecting the correct props to it.
For example, I like to include information such as:
- Controller model
- Operating voltage (5V or 12V)
- Assigned IP address
- Smart receiver identification
- Controller or enclosure name (when applicable)
Having this information visible from the outside makes setup, troubleshooting, and future maintenance much easier. Instead of opening multiple enclosures to find the one you need, the information is already right in front of you.
In addition, labeling your controllers creates consistency throughout your display. Whether you're setting up after a long offseason, expanding your show, or helping someone else troubleshoot a problem, clear identification eliminates unnecessary guesswork.
One habit I've developed over the years is assigning an IP address to every controller and printing that information directly on the enclosure. If I ever need to connect to a controller for configuration or troubleshooting, I don't have to remember the address or search through documentation—it's already labeled exactly where I need it.
The same idea applies to smart receivers and other supporting hardware. Even though a receiver may not have its own IP address, identifying its purpose and voltage helps eliminate confusion later. The more information you can see without opening an enclosure, the easier your display becomes to maintain.
Ultimately, Controller Output Labels are only one piece of an organized display. By labeling both the outputs and the controller itself, you'll spend less time searching for information and more time enjoying your holiday display.
Beginner Tips for Controller Output Labels
Clyde's Tips
If you're building your first controller, don't worry about making everything perfect. Every experienced decorator has looked back at an older controller and found something they would do differently today. The important thing is to develop good habits early, because those habits will save you time every holiday season.
Here are a few lessons I've learned after more than 13 years of building and rebuilding controllers.
Plan Before You Build
First, think about your controller layout before drilling a single hole. Consider where your pigtails, power cables, and network connections will be located. Spending a few extra minutes planning now will make your controller easier to wire, organize, and maintain later.
Label Every Output
Even if you think you'll remember which pigtail goes where, label it anyway. Months from now, after your controller has been stored away and you're setting up for another season, you'll be glad every output has a clear, easy-to-read label.
Keep Your Numbering Consistent
Choose a numbering system and stick with it. Whether you're building a single controller or an entire display, consistent Controller Output Labels make troubleshooting much easier and reduce confusion when adding new props or expanding your show.
Build for Next Year
It's easy to focus on getting the controller finished as quickly as possible. However, think about the next time you'll need to open that enclosure. Can you easily identify the controller? Can you tell which output feeds each prop? Will someone else be able to understand your labeling system? Small improvements today will save time every season.
Don't Be Afraid to Improve
One of the biggest lessons I've learned is that your first solution doesn't have to be your final solution. My own Controller Output Labels have changed several times over the years as my display grew and my building techniques improved. Every new controller gave me an opportunity to make the next one a little better.
Organization Saves More Than Time
Good organization isn't just about having a clean-looking controller. It helps prevent mistakes, speeds up setup, makes troubleshooting easier, and allows you to spend less time searching for information and more time enjoying your display. That's one of the best returns you'll ever get from a few extra minutes spent organizing your controller.
Common Mistakes When Creating Controller Output Labels
Every controller you build teaches you something new. Looking back over more than 13 years of building RGB controllers, there are several lessons I wish I had learned much sooner. Fortunately, these are all easy mistakes to avoid, and making a few small changes today can save you a lot of time and frustration next season.
Waiting Too Long to Create a Labeling System
One of the biggest mistakes I made was treating Controller Output Labels as an afterthought. When you're excited to get a controller built and into the yard, it's easy to tell yourself you'll label everything later. Unfortunately, "later" often turns into next season.
Thinking One Labeling Method Will Last Forever
As your display grows, your organization system needs to grow with it. What works well for a single 16-output controller may not work nearly as well once you're managing multiple controllers, smart receivers, and dozens of outputs. Don't be afraid to improve your Controller Output Labels as your display evolves.
Focusing Only on the Pigtails
It's easy to think that labeling the outputs is enough. However, good organization goes beyond the pigtails. Clearly identifying the controller model, operating voltage, and other important information on the enclosure itself makes setup and troubleshooting much easier. The less time you spend opening boxes to figure out what's inside, the more time you can spend enjoying your display.
Rushing the Build
I've learned that the cleanest controller builds almost always begin with good planning. Taking a little extra time to position cable glands evenly, plan wire routing, and organize your layout creates a controller that's easier to service for years to come. It's tempting to rush through the build, but those extra few minutes usually pay for themselves many times over.
Being Afraid to Change
Perhaps the biggest lesson I've learned is that there isn't one "perfect" way to organize a controller. My own Controller Output Labels have gone through several generations—from taped labels, to heat shrink, to professionally printed sleeves, to multiple versions of 3D-printed clips. Every change solved a problem that the previous version couldn't. That's part of the hobby, and it's one of the reasons I enjoy it so much.
Remember...
Your first controller isn't supposed to be your best controller.
The goal isn't perfection—it's progress.
If every controller you build is just a little more organized than the last one, you'll eventually create a system that makes setup, troubleshooting, and maintenance almost effortless.
Or, as I've learned over the years... You get BETTER with every setup!
Watch the Complete Video
Final Thoughts
Looking back over the past 13 years, it's interesting to see how something as simple as Controller Output Labels has continued to evolve. What started as a few printed labels and a roll of tape eventually became heat shrink labels, professionally printed sleeves, and finally a collection of custom 3D-printed designs that continue to improve with every new controller I build.
The biggest lesson I've learned isn't that one labeling method is better than another. It's that every controller you build is an opportunity to improve your process. Each season you'll discover something that could be organized a little better, labeled a little clearer, or planned a little more carefully. Those small improvements don't just make your controllers look nicer—they make setup faster, troubleshooting easier, and maintenance far less frustrating.
If you're building your very first controller, don't feel like you have to get everything perfect. None of us did. Start with a system that makes sense today, then refine it as your display grows and your experience increases. Before long, you'll have a labeling system that's tailored to your display and the way you work.
Most importantly, remember that Controller Output Labels aren't really about labels at all. They're about respecting your future self. Every few minutes you spend organizing a controller today is time you'll get back when you're setting up your display next season.
So, whether you're using a label printer, heat shrink, or designing your own 3D-printed clips, keep improving, keep learning, and don't be afraid to rethink yesterdays ideas.
Because after all...
Next Year Will Thank You.
Continue Learning
Keep building your controller knowledge with these related Pixel Pro Displays tutorials and guides.
Assemble Your First RGB Pixel Controller
How to Build the RGB2Go Octa8 Controller
RGB2Go Octa2Go Controller Review
Backer Board Template for your controller build
Controller Wiring Basics (Build the Baldrick 8 Controller)
Controller Output Labels: Create Them in Tinkercad for 3D Printing